
0
Owner's of the Celestron Microscope & Magnifier LCD DIgital Microscope gave it a score of 0 out of 5. Here's how the scores stacked up:
C. Stamp Mode – if you desire to have the time alone, date alone, or the time and date together stamped on
your images you can select which one, or you can choose to have no stamp.
D. DV record – if you want to take a short video, push the OK key and the video image will appear in the
lower left of the screen. Resolution is automatically changed to low resolution for video. Press OK to
finish. The rate is 25fps.
E. Setting – “on Time snap” to set the internal clock. Use the OK and directional keys to make the changes.
“Stamp time” allows you to set the date and time by using the OK and directional keys. Press OK to end.
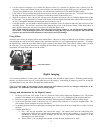
Taking Images
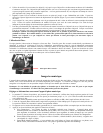
1. Snapshots – to take snapshots make sure you are in the camera mode (camera icon in the lower left of the screen)
and you will use the Snap Key on the LCD Monitor. Push the key when ready and the image will be stored in the
internal storage memory.
2. Video – change the settings to the DV record and then the movie camera icon will appear in the lower left of the
screen. Use the Snap Key to begin the video and also to end it. The movie camera icon will flash to let you know
that you are recording a video. Also, the elapsed time of the video is shown on the screen.
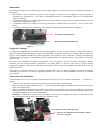
3. You can also take images (snapshot or video) by using an SD (Secure Digital) Card. Your SD card is inserted in
the LCD Monitor (1). When you insert the SD card properly the SD card icon will be visible at the top of the LCD
screen. On the bottom right of the screen will be shown the memory available on the SD card. When imaging this
way the images are saved on the SD card and not in the internal storage memory.
Note: Inserting or removing an SD card while the LCD is on may cause the LCD to shut down and/or could
damage the SD card.
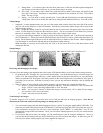
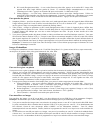
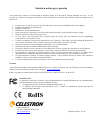
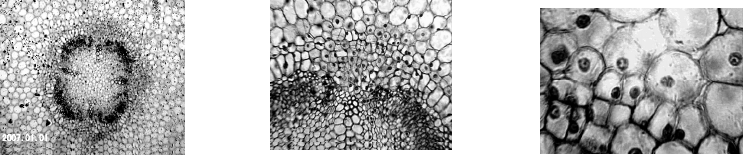
Sample Images
The following specimen images left to right below were taken at 40x, 100x, 400x of Vicia Faba Young Root C.S.
Reviewing and Managing Your Images
You can review and manage your snapshots and videos on the LCD Monitor that are saved in the internal storage memory.
1. By pushing the ESC (Change) Key, you enter the stored images. Use the directional keys to select the image you
want to view (the selected image will have a yellow border around it) and press the OK Key to view this image.
When you push the ESC Key again it will take you back to the stored images and if you push ESC Key again, it
will return you to real time. Note that if viewing a video, you can stop and start it during the video by pushing the
OK Key.
2. When you have an image with the yellow border around it, you can manage it by pushing the Menu Key:
A. Protect – you can make selections by pushing the OK Key. You have a choice of “Lock” to protect this
image, “Unlock” to leave the image unprotected or “Exit” the menu.
B. Delete – you can select “Current” to delete this image or you can select “All” to delete all your images.
You can select “Exit” to leave the menu.
C. Cancel – select this to leave the menu.
Transferring Your Images
To transfer images to a PC or MAC, you need to have a free USB port and have an imaging program. Note: Do not
disconnect the USB cable while transferring images or damage may occur.
1. You can transfer images from the internal storage memory to your PC by using the supplied Mini USB Cable. The
small plug end of the cable plugs into the LCD Monitor (2) and the large plug end of the cable plugs into your PC.
If the connections are proper you will see on your microscope screen “MSDC” or similar data. Your PC will
automatically recognize the new hardware. Then, you will choose which program on your PC you want to transfer
the images to.
2. If you used an SD card to store your images, you can transfer them to your PC using the method in # 1 above or
you can take the SD card out and use the SD card slot on your PC to transfer the images. In either way your PC
will ask you to choose which program you want to transfer the images to.
7


Find Your Products By Category
- Communications
- Photography
- Portable Media
- Home Audio
- Kitchen Appliance
- Computer Equipment
- TV and Video
- Cell Phone
- Household Appliance
- Video Game
- Laundry Appliance
- Musical Instruments & Equipment
- Power Tools
- Automotive
- Car Audio and Video
- Outdoor Cooking
- Marine Equipment
- Lawn and Garden
- Personal Care
- Fitness & Sports
- Baby
Please Login
