

4.1
Owner's of the Humminbird Marine GPS System 4087301 gave it a score of 4.1 out of 5. Here's how the scores stacked up:


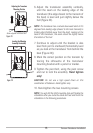

4. Make sure that the drill bit is perpendicular to the actual surface of the
transom, NOT parallel to the ground, before you drill. Using a 5/32” bit,
drill the two holes only to a depth of approximately 1”.
NOTE: On fiberglass hulls, it is best to use progressively larger drill bits to reduce the
chance of chipping or flaking the outer coating.
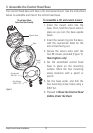
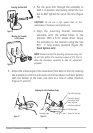
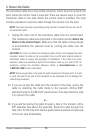
3. Assemble and Mount the Transducer
In this procedure, you will assemble the transducer using the hardware
provided, then mount it and make adjustments to its position without locking
it in place.
NOTE: You will initially assemblethe transducerand the mounting bracket bymatching
thetworatchets to anumberedposition on the transducerknuckle. Furtheradjustments
may be necessary.
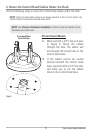
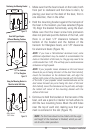
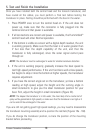
1a. If you already know your transom angle, refer to the chart below for
the initial position to use to set the ratchets (Figure 16). If your transom
is angled at 14 degrees (a common transom angle for many boats) use
position 1 for the ratchets. In either case, go to step 2.
or...
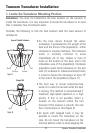
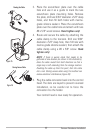
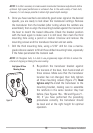
1b. If you do not know your transom angle, measure it using a plumb line
(weighted nylon string or monofilament line) exactly 12 inches long.
Hold the top of the plumb line against the top of the transom with your
finger, and wait until the line hangs straight down (Figure 17). Using a
ruler, measure the distance from the bottom of the plumb line to the
back of the transom, then use the chart (Figure 16).
NOTE: It isimportant to takeyourmeasurement in the locationshown in Figure17,
from exactly12 inches down from the top of the transom.
Figure16
-2 -1 0 1 2 3 4 5 6 7 8 9 10 11 12 13 14 15 16 17 18 19 20 21 22 23 24
Transom Angle (°)
Bead Alignment
Number
142531425
25 26 27
3
28 29 30
1
Measured Distance (x)
1.1cm
1/2“
0.0 cm
0“
2.5 cm
1“
4.3 cm
1 5/8“
5.9 cm
2 3/8“
7.6 cm
3“
9.3cm
3 5/8“
11.1cm
4 3/8“
12.9cm
5“
14.9cm
5 7/8“
16.9cm
6 5/8“
12
Transom Transducer Installation


Find Your Products By Category
- Communications
- Photography
- Portable Media
- Home Audio
- Kitchen Appliance
- Computer Equipment
- TV and Video
- Cell Phone
- Household Appliance
- Video Game
- Laundry Appliance
- Musical Instruments & Equipment
- Power Tools
- Automotive
- Car Audio and Video
- Outdoor Cooking
- Marine Equipment
- Lawn and Garden
- Personal Care
- Fitness & Sports
- Baby
Please Login
