

4.1
Owner's of the Humminbird Marine GPS System 4087301 gave it a score of 4.1 out of 5. Here's how the scores stacked up:
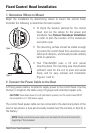
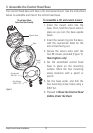


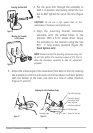

5. Align the pivot knuckle with the mount base arms and slide into place,
twisting slightly if necessary, until the unit is firmly seated.
6. Rotate the control head to the desired angle and hand tighten the
thumbknob bolt.
7. Thread the gimbal knob onto the pivot bolt and tighten.
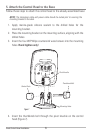
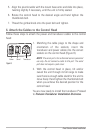
6. Attach the Cables to the Control Head
Follow these steps to attach the power and transducer cables to the control
head:
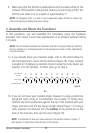
1. Matching the cable plugs to the shape and
orientation of the sockets, insert the
transducer and power cables into the correct
sockets on the control head (Figure 8).
NOTE: The serial port is for authorized service personnel
use only. Do not connect a cable to this port. The serial
port does not require aport cover.
2. With the control head in place, tilt and/or
swivel the unit through its full range to make
sure there isenough cable slack for the unit to
move freely. Hand tighten the thumbknob bolt
when you achieve the desired position for the
control head.
You are now ready to install the transducer. Proceed
to Transom Transducer Installation Overview.
Figure8
Power Serial Transducer
7
Fixed Control Head Installation


Find Your Products By Category
- Communications
- Photography
- Portable Media
- Home Audio
- Kitchen Appliance
- Computer Equipment
- TV and Video
- Cell Phone
- Household Appliance
- Video Game
- Laundry Appliance
- Musical Instruments & Equipment
- Power Tools
- Automotive
- Car Audio and Video
- Outdoor Cooking
- Marine Equipment
- Lawn and Garden
- Personal Care
- Fitness & Sports
- Baby
Please Login
