
3.5
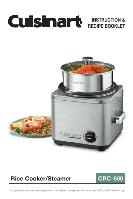
Owner's of the Cuisinart Rice Cooker CRC-800 gave it a score of 3.5 out of 5. Here's how the scores stacked up:


the proper water line. For example, if you
added 2 cups of raw rice, add water to line 2
(white rice only).
5. Cover the cooking bowl with lid. Make sure the
steam vent is facing toward the back of the unit.
6. Plug in unit.
7. Set to the cook position by pressing the switch
down. The Cook LED light will be illuminated.
8. Rice cooker will heat and cook the rice.
Cooking time will vary, depending on the
amount and type of rice or grain being cooked.
9. Once the rice is cooked, the unit will automati-
cally switch to the Warm setting and the Warm
LED will be illuminated. The unit will stay in
Warm mode until the unit is unplugged from
the outlet.
10. For best texture, allow cooked rice to rest in
Warm mode for 5 to 10 minutes.
11. Once you are ready to serve the rice, lift the lid
away from you.
12. Fluff rice with paddle or utensil suitable for
nonstick cookware.
13. Lift and remove cooking bowl from rice cooker
using potholders.
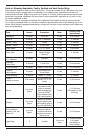
Cooking Rice and Steaming
1. Clean and prepare your vegetables, seafood, fish
or poultry.
2. Follow steps 1 to 8 under the Cooking Rice
section (page 4).
3. Fill the steaming tray with open end facing up.
4. Place the filled steaming tray on top of the
cooking bowl at the appropriate time for food
being steamed. See Steaming Guide (page 7), for
approximate cooking times.
5. Place lid on top of the steaming tray.
6. When the appropriate cooking time has elapsed,
unplug the unit.
Steaming Only
1. Make sure unit is unplugged.
2. Fill cooking bowl with the suggested amount of
water based on the Steaming Guide.
3. Fill the steaming tray with open end facing up.
4. Place the filled steaming tray on top of the
cooking bowl.
5. Place lid on top of the steaming tray.
6. When water is completely evaporated, the unit
will automatically switch to the Warm setting and
the Warm LED will be illuminated. The unit will
stay in Warm mode until the unit is unplugged
from the outlet. Do not allow bowl to boil dry.
7. For best results, unplug unit immediately
after the unit switches to Warm, to prevent
over-cooking.
Reheating Rice
1. Make sure unit is unplugged.
2. To reheat rice, add ¼ cup (4 tablespoons) of cold
water per cup of cooked rice.
3. Stir to mix.
4. Place lid on top of the cooking bowl.
5. Plug in unit and set to the cook position by
pressing the switch down. The Cook LED light
will be illuminated.
6. Once the rice is cooked, the unit will automati-
cally switch to the Warm setting and the Warm
LED will be illuminated. The unit will stay in Warm
mode until the unit is unplugged from the outlet.
CLEANING AND CARE
1. Unplug your Cuisinart
®
Rice Cooker/Steamer and
allow it to cool before cleaning.
2. Place cooking bowl, steaming tray and lid in the
dishwasher or wash with warm, soapy water. If
food sticks to the surface, fill with warm, soapy
water and allow to soak before cleaning.
3. If scouring is necessary, use a nonabrasive
cleanser or liquid detergent with a nylon pad
or brush.
4. Wipe base of unit with a soft, damp cloth or
microfiber towel. NEVER IMMERSE BASE OF
UNIT IN WATER.
5. Make sure all parts are cool before storing. Store
unit in a clean, dry place.
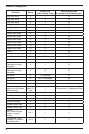
COOKING CHARTS
Guide for Cooking Rice (see chart, next page)
Cooking times will vary according to amount and
temperature of cooking liquid.
The simplest way to cook long grain (converted)
white rice is to place rice in cooking bowl and add
liquid to appropriate line marking. For example,
using the rice measuring cup provided, fill cooking
bowl with 2 cups rice. Then, add water to the 2 cup
water marking inside the bowl. If using 3 cups of
rice, add water to the 3 cup water marking inside
the pot. Do the same when using 4 to 8 cups of
rice. Please note that preparing less than 2 cups of
rice is not recommended.
For grains or brown and specialty rices, use the
chart provided below. Note that you should not
prepare these in amounts smaller or larger than
stated in the chart.
All rice/grain is measured in the rice cooker cup. All
water/liquid is measured in a standard liquid mea-
suring cup.
5


Find Your Products By Category
- Communications
- Photography
- Portable Media
- Home Audio
- Kitchen Appliance
- Computer Equipment
- TV and Video
- Cell Phone
- Household Appliance
- Video Game
- Laundry Appliance
- Musical Instruments & Equipment
- Power Tools
- Automotive
- Car Audio and Video
- Outdoor Cooking
- Marine Equipment
- Lawn and Garden
- Personal Care
- Fitness & Sports
- Baby
Please Login
