
0
Owner's of the Brother Photo Scanner Brother Photo Scanner gave it a score of 0 out of 5. Here's how the scores stacked up:


Scan Using the Control Panel
132
6
g Load your document.
h Press and then . The machine starts scanning.
(ADS-1500W)
a Load your document.
b Press d or c to display to PC.
c Press to PC.
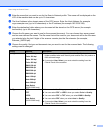
d Press d or c to display the Scan-to action you want to do (to OCR, to File, to Image or
to E-mail).
e Press the Scan-to action you want to do and then OK.
f Press a or b to display the destination computer you want to save on.
Press the destination computer.
g If the PIN entry screen is displayed, enter the four-digit PIN and press OK.
h Press Start.
The machine starts the scanning process.
NOTE
• You can configure the Scan-to settings from your computer. See Change Scan to PC Settings (Windows
®
)
on page 151 or Change Scan to PC Settings (Macintosh) on page 157.
• If you want to save the settings as a shortcut, press Save as Shortcut. For more information, see
Create Scan Shortcuts (ADS-1500W only) on page 163.
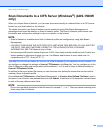
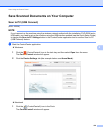
Scan to PC (Network Connect) 6
(ADS-1000W)
NOTE
If you have set up the machine using the USB interface method, you need to set up the machine using the
wireless network method with the installation DVD-ROM and a USB cable (see the Quick Setup Guide) to
display the Scan to Net Settings button in the ControlCenter application and to use the Scan to PC
(Network Connect) feature.
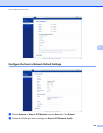
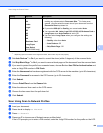
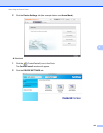
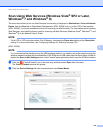
a Start the ControlCenter application.
Windows
®
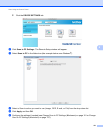
1 Click the (ControlCenter4) icon in the task tray and then select Open from the menu.
The ControlCenter4 window will appear.


Find Your Products By Category
- Communications
- Photography
- Portable Media
- Home Audio
- Kitchen Appliance
- Computer Equipment
- TV and Video
- Cell Phone
- Household Appliance
- Video Game
- Laundry Appliance
- Musical Instruments & Equipment
- Power Tools
- Automotive
- Car Audio and Video
- Outdoor Cooking
- Marine Equipment
- Lawn and Garden
- Personal Care
- Fitness & Sports
- Baby
Please Login
