
0
Owner's of the Alesis Electronic Keyboard Alesis Electronic Keyboard gave it a score of 0 out of 5. Here's how the scores stacked up:


4
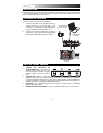
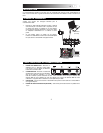
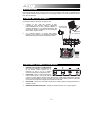
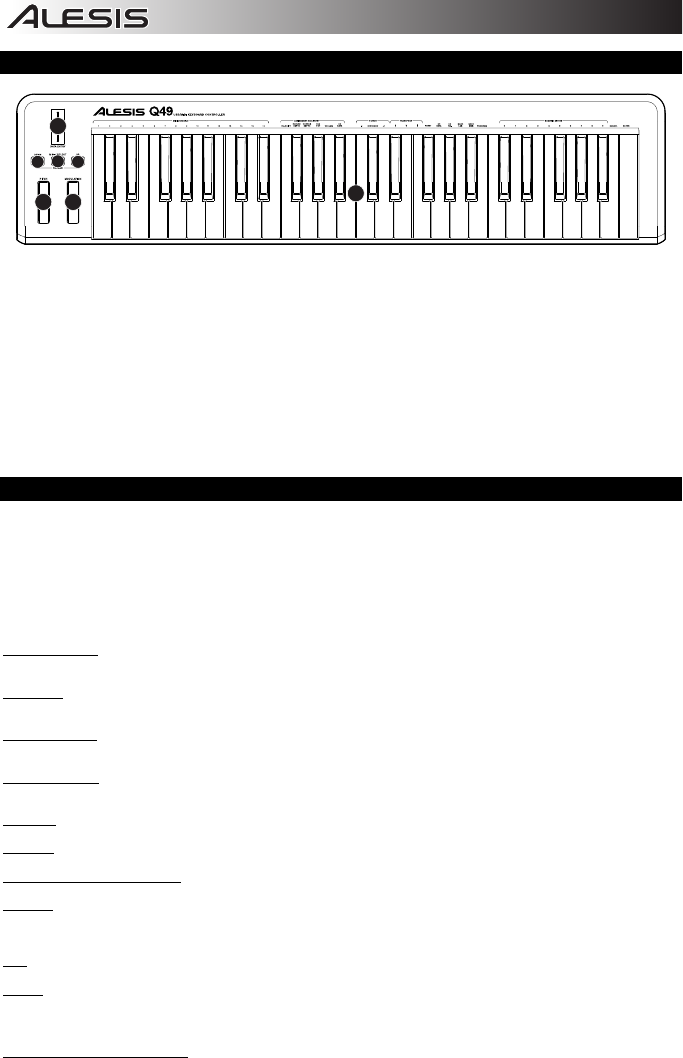
TOP PANEL OVERVIEW
1
2
6
5
6
4
3
1. KEYBOARD – The KEYBOARD functions as a normal electronic piano keyboard during performance but can also be
used to adjust MIDI settings and send MIDI messages. The labels above the keys indicate their functions. The
numbered keys allow you to enter values for settings. Press the Cancel or Enter key to cancel or confirm your selection,
respectively. See SELECTING & EDITING MIDI COMMANDS for more information.
2. PITCH BEND WHEEL – Transmits MIDI Pitch Bend information to raise or lower the pitch of a note temporarily.
3. MODULATION WHEEL – This wheel can be used to transmit continuous controller data (CC #1 or Modulation Depth).
4. DATA ENTRY SLIDER – This slider lets you send MIDI messages for the currently selected parameter from the
KEYBOARD (e.g., REVERB DEPTH, VOLUME, etc.). You can select a parameter by pressing MIDI / SELECT then the
corresponding key on the KEYBOARD.
5. MIDI / SELECT – Pressing this button allows you to adjust MIDI settings and send MIDI messages by pressing labeled
keys on the KEYBOARD. See SELECTING & EDITING MIDI COMMANDS for more information.
6. OCTAVE UP / DOWN – These buttons can be used to shift the keyboard's range up and down.
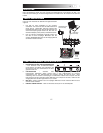
SELECTING & EDITING MIDI COMMANDS
The MIDI / SELECT button and the keys on the KEYBOARD allow you to adjust MIDI parameters and send precise MIDI
messages and information quickly and easily:
1. Press MIDI / SELECT.
2. Press the key on the KEYBOARD whose MIDI setting (printed above the key) you want to adjust
or send.
3. Enter a value with the numbered keys on the KEYBOARD.
4. Press the Enter or Cancel key on the KEYBOARD to confirm or cancel your choice, respectively.
5. Press MIDI / SELECT.
MIDI CHANNELS – Selects the MIDI channel (1-16) over which the Q49 will transmit MIDI messages. The default is Channel
1.
VELOCITY – Press this key to set the DATA ENTRY SLIDER to adjust the note velocity. Increasing this value increases the
MIDI velocity value generated by a light key press.
REVERB DEPTH – Press this key to set the DATA ENTRY SLIDER to CC #91 (Reverb Send Level). The default value for this
setting is 64.
CHORUS DEPTH – Press this key to set the DATA ENTRY SLIDER to CC #93 (Chorus Send Level). The default value for this
setting is 64.
PAN POT – Press this key to set the DATA ENTRY SLIDER to CC #10 (Pan). The default value is 64 (center).
VOLUME – Press this key to set the DATA ENTRY SLIDER to CC #7 (Channel Volume).
CC DATA (Control Change Data) – Sets the value to be sent. Pressing the Enter key will send a MIDI message.
OCTAVE – Lowers or raises the octave range of the KEYBOARD with the "OCTAVE –" and "OCTAVE +" buttons, respectively.
You can transpose the keyboard up to two octaves in either direction. Press STANDARD to return the KEYBOARD to its
original octave range
b / # – Lowers or raises (respectively) the pitch of the entire KEYBOARD a semitone.
RESET – Press this key followed by the Enter key to send a reset message to all controllers and return the Q49 to its original
settings.
Note: This button does not reset the current octave range or transposition of the KEYBOARD.
CC NO. (Control Change Number)
– Sets the MIDI CC# to be sent. (A message will not be sent until the Enter key is pressed
when selecting CC Data.)


Find Your Products By Category
- Communications
- Photography
- Portable Media
- Home Audio
- Kitchen Appliance
- Computer Equipment
- TV and Video
- Cell Phone
- Household Appliance
- Video Game
- Laundry Appliance
- Musical Instruments & Equipment
- Power Tools
- Automotive
- Car Audio and Video
- Outdoor Cooking
- Marine Equipment
- Lawn and Garden
- Personal Care
- Fitness & Sports
- Baby
Please Login
