

0
Owner's of the Acer Computer Monitor Monitor gave it a score of 0 out of 5. Here's how the scores stacked up:


7
English
Installation
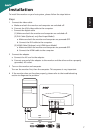
To install the monitor on your host system, please follow the steps below:
Steps
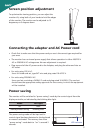
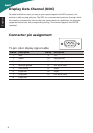
1 Connect the video cable
a Make sure both the monitor and computer are switched off.
b Connect the VGA video cable to the computer.
c Connect the digital cable
(1) Make sure both the monitor and computer are switched off.
(2) DVI Cable (Optional, only Dual-Input Model)
a. Make sure both the monitor and computer are powered-OFF.
b. Connect the DVI cable to the computer.
(3) HDMI Cable (Optional, only HDMI-Input Model)
a. Make sure both the monitor and computer are powered-OFF.
b. Connect the HDMI cable to the computer.
2 Connect the adapter
a Connect the AC cord to the adapter.
b Connect one end of the adapter to the monitor and the other end to a properly
grounded, AC outlet.
3 Turn on the monitor and computer
Turn on the monitor first, then the computer. This sequence is very important.
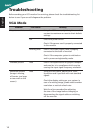
4 If the monitor does not function properly, please refer to the troubleshooting
section to diagnose the problem.
DC-IN
D-SUB
DVI
HDMI
DC-IN
D-SUBDVI
HDMI
HDMI
DVI
D-SUB
DC
2
2


Find Your Products By Category
- Communications
- Photography
- Portable Media
- Home Audio
- Kitchen Appliance
- Computer Equipment
- TV and Video
- Cell Phone
- Household Appliance
- Video Game
- Laundry Appliance
- Musical Instruments & Equipment
- Power Tools
- Automotive
- Car Audio and Video
- Outdoor Cooking
- Marine Equipment
- Lawn and Garden
- Personal Care
- Fitness & Sports
- Baby
Please Login
