
3.0
Owner's of the Panasonic Fax Machine KX-FL511 gave it a score of 3.0 out of 5. Here's how the scores stacked up:

3. Telephone
34
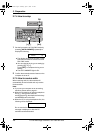
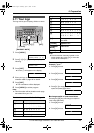
Display while viewing
L When the unit did not receive name
information, the display will show “NO NAME
RCVD”.
L When no calls have been received, the
display will show “NO CALLER DATA”.
To edit a telephone number for calling back
Press {*} repeatedly after step 2. Each time
you press {*}, the telephone number will be
changed as follows:
1. 1 - Area code - Local telephone number (“1”
added)
2. Local telephone number (area code omitted)
3. Area code - Local telephone number
4. 1 - Local telephone number (“1” added and
area code omitted)
To stop viewing
Press {STOP} after step 2.
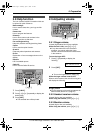
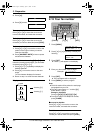
3.8 Printing the Caller ID
list
L Keep the front cover page open for button
locations.
1 Press {CALLER ID PRINT} to start printing.
L The display will show “ALL ERASE OK?”
after printing.
2 Press {STOP} to exit the program.
L To erase all of the stored caller
information, press {SET} instead of
{STOP}.
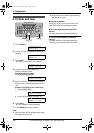
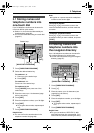
3.9 Erasing caller
information
L Keep the front cover page open for button
locations.
3.9.1 Erasing all caller
information
1 Press {MENU} repeatedly to display
“CALLER SET UP”.
2 Press {SET}.
3 Press {SET}.
L To cancel erasing, press {STOP}, then
{MENU}.
4 Press {SET}.
5 Press {STOP} to exit the program.
3.9.2 Erasing specific caller
information
1 Press {CALLER ID SEARCH}.
2 Press {A} or {B} repeatedly to display the
desired entry.
3 Press {<}.
L To cancel erasing, press {STOP} 2 times.
4 Press {SET}.
L To erase other entries, repeat steps 2 to
4.
5 Press {STOP} to exit the program.
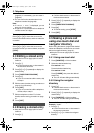
3.10 Storing caller
information
Important:
L This feature is not available in the
following cases.
– The telephone number includes data
other than numbers (i.e., * or #).
– The caller information does not
include a telephone number.
L Keep the front cover page open for button
locations.
1 Press {CALLER ID SEARCH}.
2 Press {A} or {B} repeatedly to display the
desired entry.
3 Press {DIRECTORY PROGRAM}.
4 Select the station key or navigator directory.
For stations 1–3:
1. Press the desired station key.
2. Press {SET}.
3. Press {SET}.
For stations 4–11:
1. Press the desired station key.
2. Press {SET}.
For stations 12–22:
1. Press {LOWER}, then press the desired
station key.
2. Press {SET}.
For navigator directory:
1. Press {<} or {>}.
2. Press {SET}.
FL511.book Page 34 Thursday, April 17, 2003 1:42 PM


Find Your Products By Category
- Communications
- Photography
- Portable Media
- Home Audio
- Kitchen Appliance
- Computer Equipment
- TV and Video
- Cell Phone
- Household Appliance
- Video Game
- Laundry Appliance
- Musical Instruments & Equipment
- Power Tools
- Automotive
- Car Audio and Video
- Outdoor Cooking
- Marine Equipment
- Lawn and Garden
- Personal Care
- Fitness & Sports
- Baby
Please Login
