
3.6
Owner's of the Magnavox VCR Dual Player gave it a score of 3.6 out of 5. Here's how the scores stacked up:

VCR FUNCTIONS
–
14
–
EN
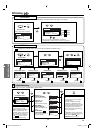
Note:
• If you have not set the clock, “CLOCK SET” menu will appear at step 2. Refer to “Clock Setting” on page 8.
• You cannot set the ending time for the satellite link timer recording on this unit.
• Recording picture will be distorted if the copy protection signal is being detected during satellite link timer recording.
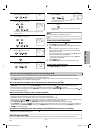
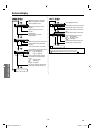
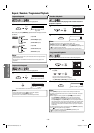
• When a regular timer recording and the satellite link timer recording are overlapped, those recordings are recorded as illustrated below.
5
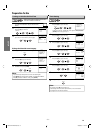
Set the desired start minutes.
If you wish to go back to the left, press [s ].
6
Press [B] to set satellite link standby mode.
• TIMER REC indicator on this unit lights up and the unit goes to the
DVD mode. If you do not use DVD function, turn off the unit.
• Satellite unit must be turned on for VCR satellite link to start.
If an external tuner is not set to output signals, satellite link will
remain in standby mode.
To cancel the satellite link function in standby mode:
Press [TIMER SET] on the remote control or [STOP/EJECT C A] on
this unit.
To cancel the satellite link function while the satellite link
recording is in progress:
Press [STOP/EJECT C A] on this unit.
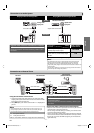
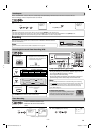
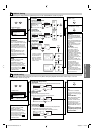
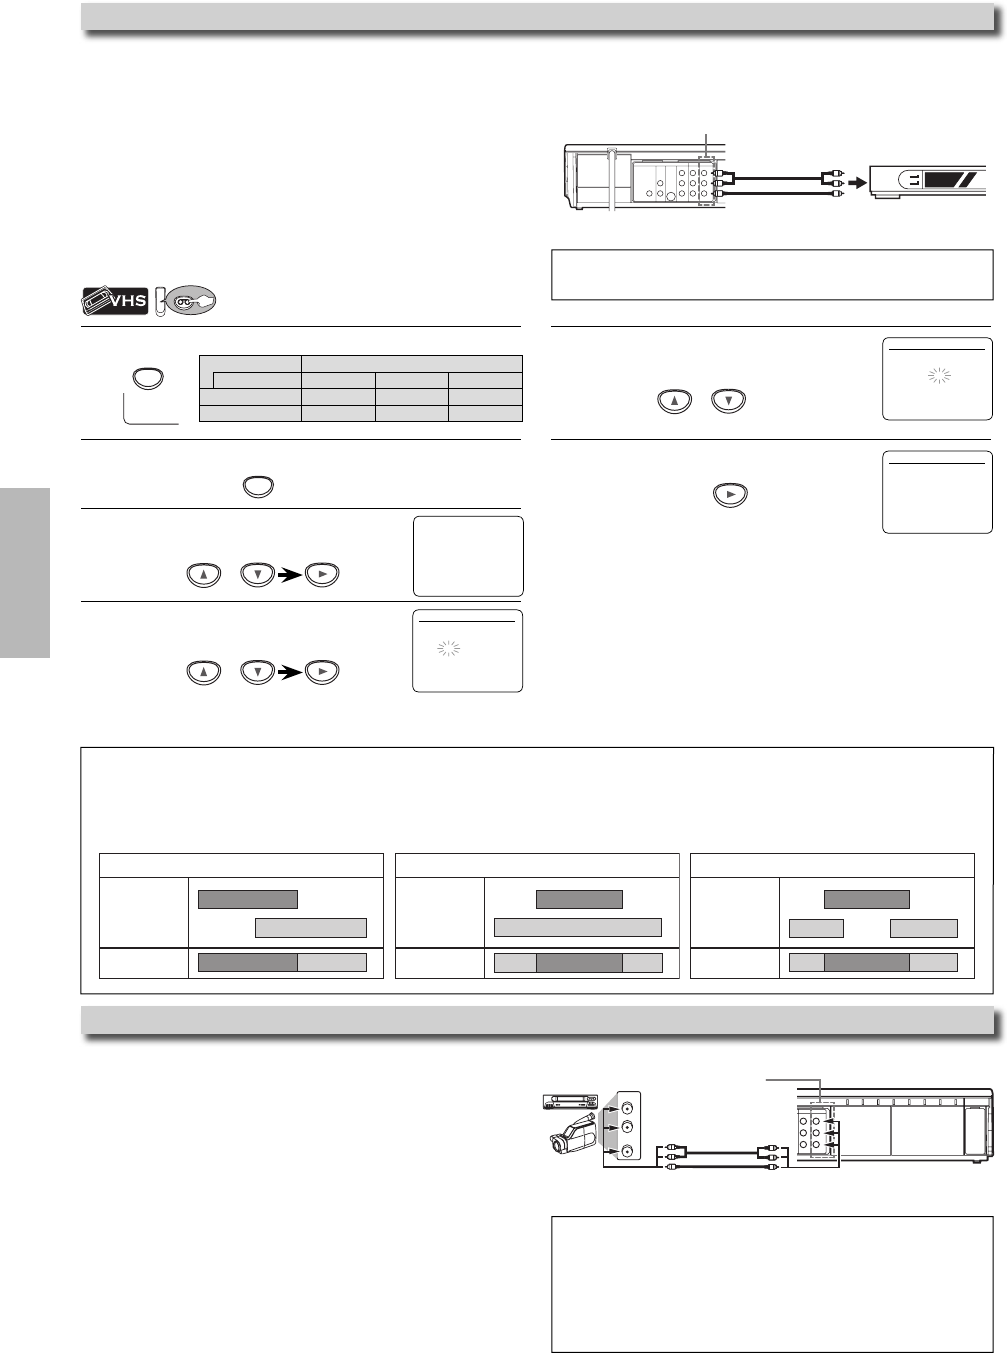
Copying a Cassette Tape
Warning: Unauthorized recordings of copyrighted cassette tapes
may be an infringement of copyright laws.
1) Insert a pre-recorded cassette tape into another external
device for playback.
2) Insert a recordable cassette tape into this unit for recording.
3) Press [SPEED] on the remote control to select recording
speed (SP or SLP).
4) Press [INPUT] on the remote control to select L1 or L2.
Choose L1 if device is connected to rear input jacks, or L2 if
connected to the front. Refer to “Front & Rear Terminals” on
page 9 for more details.
5) Press [RECORD] on the unit.
6) Press “PLAY” button on the external device.
7) To stop recording, press [STOP/EJECT C A] on this unit,
then stop playback of the external device.
Note:
• For best results during dubbing, use buttons on this unit whenever
possible. The remote control might affect another device’s operation.
• Always use video-quality shielded cables with RCA-type connectors.
Standard audio cables are not recommended.
• L2 input jacks are on the front of this unit.
• Please purchase the necessary cables at your local store. (Refer to page 7.)
1
Press [SPEED] to select the desired tape speed.
2
In stop mode, press [SETUP].
3
Select “SATELLITE LINK”.
Then press [B] to go to next step.
4
Set the desired start hour.
Then press [B] to go to next step.
• The hour can be selected from 1-12 with AM or PM.
• When the external tuner signal is stopped, recording will be stopped.
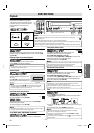
- M E N U -
TIMER PROGRAMMING
B SATELLITE LINK
AUTO REPEAT [OFF]
CLOCK SET
LANGUAGE SELECT
SATELLITE LINK
0 1 : 3 0 PM
[ON]
e.g.) In case of the timer recording is programmed in the middle
of the satellite link timer recording
timer recording
recording result
satellite link
e.g.) In case of the timer recording is overlapped on the existing
satellite link timer recording.
timer recording
recording result
satellite link
e.g.) In case of the satellite link timer recording is overlapped
on the existing timer recording.
timer recording
recording result
satellite link
SETUP
or
or
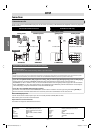
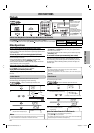
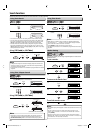
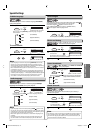
Preparation on the tuner
• Satellite link accepts only the connection from L1 (rear) with the
external tuner. (The connection from L2 cannot read any signals
from the external tuner.)
•
The external tuner should be equipped with some kind of timer
function. Using timer function of the tuner, set it to output audio/video
signals when it comes to the time you want to start recording, and
stop output audio/video signals when it comes to the time you want to
finish recording. Refer to the tuner’s manual on how to set the timer.
• Make sure to turn off the tuner when you finish setting.
VCR
VCR
SP
SPEED
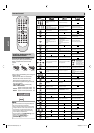
Tape speed Recording / playback time
Type of tape T60 T120 T160
SP mode 1hour 2hours 2-2/3hours
SLP mode 3hours 6hours 8hours
SATELLITE LINK
1 2 : 0 0 AM
Satellite Link
You can set the unit to start recording whenever it detects a video signal from the external tuner.
Preparing for the Satellite Link Timer Recording:
Preparation on this unit
COAXIAL
DVD VCR
DVD/VCR
AUDIO I N
VIDEO IN
AUDIO OUT
AUDIO
OUT
DIGITAL
AUDIO OUT
S-VIDEO
OUT
COMPONENT
VIDEO OUT
VIDEO OUT
L
LY
R
L
R
R
C
B
/
P
B
C
R
/
P
R
external tuner
RCA audio/video cables
L1
VCR
DVD/VC R
AUDIO IN
VIDEO IN
AUDIO OUT
VIDEO OUT
L
R
L
R
AUDIO OUT
VIDEO OUT
L
R
or
output jacks of
external device
rear of the unit
RCA audio/video
cables
L1
You can use a video disc player, cable/satellite box or other audio/video
component with audio/video output jacks.
SATELLITE LINK
0 1 : 0 0 PM
or
Note:
• Please purchase the necessary cables at your local store. (Refer to page 7.)
E8E62UD-DV225MG9.indd 14E8E62UD-DV225MG9.indd 14 2008/02/01 11:46:322008/02/01 11:46:32


Find Your Products By Category
- Communications
- Photography
- Portable Media
- Home Audio
- Kitchen Appliance
- Computer Equipment
- TV and Video
- Cell Phone
- Household Appliance
- Video Game
- Laundry Appliance
- Musical Instruments & Equipment
- Power Tools
- Automotive
- Car Audio and Video
- Outdoor Cooking
- Marine Equipment
- Lawn and Garden
- Personal Care
- Fitness & Sports
- Baby
Please Login
