

0
Owner's of the Humminbird Marine GPS System 4086301 gave it a score of 0 out of 5. Here's how the scores stacked up:
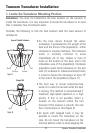


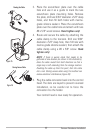
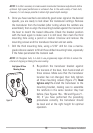

4. Route the Cable
The transducer cable has a low profile connector, which must be routed to the
point where the control head is mounted. There are several ways to route the
transducer cable to the area where the control head is installed. The most
common procedure routes the cable through the transom into the boat.
NOTE: Your boatmayhavea pre-existing wiringchannelor conduitthatyoucan usefor
the transducer cable.
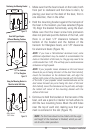
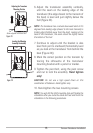
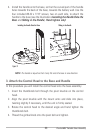
1. Unplug the other end of the transducer cable from the control head.
(The transducer cable was connected in the earlier section Attach the
Cables to the Control Head
). Make sure that the cable is long enough
to accommodate the planned route by running the cable over the
transom.
CAUTION! Donot cut or shorten thetransducer cable, and try not to damage the cable
insulation. Route the cable as far as possible from any VHF radio antenna cables or
tachometer cables to reduce the possibility of interference. If the cable is too short,
extension cables are available to extend the transducer cable up to a total of 50'. For
assistance, contact the Customer Resource Center at humminbird.com or call
1-800-633-1468 for more information.
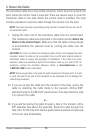
NOTE: Allow enough slack in the cable for slight movement at the pivot point. It is best
to route the cable to the side of the transducer so the transducer will not damage the
cable during movement.
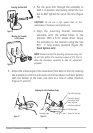
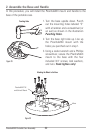
2a. If you are routing the cable over the transom of the boat, secure the
cable by attaching the cable clamp to the transom, drilling 9/64"
diameter holes for the #8 x 5/8" wood screws, then skip directly to step
5 to connect the cable.
or...
2b. If you will be routing the cable through a hole in the transom, drill a
5/8" diameter hole above the waterline. Route the cable through this
hole, then fill the hole with marine-grade silicone sealant and proceed
to the next step immediately.
16
Transom Transducer Installation


Find Your Products By Category
- Communications
- Photography
- Portable Media
- Home Audio
- Kitchen Appliance
- Computer Equipment
- TV and Video
- Cell Phone
- Household Appliance
- Video Game
- Laundry Appliance
- Musical Instruments & Equipment
- Power Tools
- Automotive
- Car Audio and Video
- Outdoor Cooking
- Marine Equipment
- Lawn and Garden
- Personal Care
- Fitness & Sports
- Baby
Please Login
