

0
Owner's of the Humminbird Fish Finder 409010-1 gave it a score of 0 out of 5. Here's how the scores stacked up:

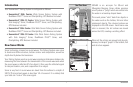

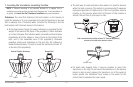

Installation - Gimbal Mount
8
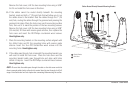
NOTE: Alternate hole patterns are available on the gimbal mounting bracket, and
may match existing holes on the boat. You may choose to use one of these
alternate hole patterns.
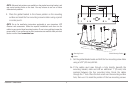
4. Place the gimbal bracket in the chosen position on the mounting
surface and mark the four mounting screw locations using a pencil
or center punch.
NOTE: Go to the installation instructions applicable to your transducer, GPS
Receiver and accessories. Make the required installations and then run the
cables to your control head mounting location. Do not cut any cabling (except the
power cable). If your cables are too short, extensions are available from your local
dealer or online from humminbird.com.
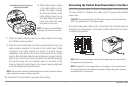
5. Set the gimbal bracket aside and drill the four mounting screw holes
using a 5/32" (4.0 mm) drill bit.
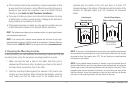
6a. If the cables must pass through a hole directly beneath the
mounting bracket, mark and drill an additional 1" (25 mm) hole
centered between the four mounting holes. Route the cables
through the 1" hole. Place the hole cover over the mounting surface
hole, then use it to mark the position of the two mounting screws.
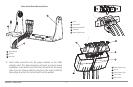
Mounting Screws
1
Washer
2
Gimbal Mounting Bracket
3
1
3
2


Find Your Products By Category
- Communications
- Photography
- Portable Media
- Home Audio
- Kitchen Appliance
- Computer Equipment
- TV and Video
- Cell Phone
- Household Appliance
- Video Game
- Laundry Appliance
- Musical Instruments & Equipment
- Power Tools
- Automotive
- Car Audio and Video
- Outdoor Cooking
- Marine Equipment
- Lawn and Garden
- Personal Care
- Fitness & Sports
- Baby
Please Login
