

0
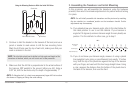
Owner's of the Humminbird Fish Finder 409000-1 gave it a score of 0 out of 5. Here's how the scores stacked up:

19
Transom Mount - DualBeam PLUS™
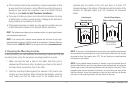
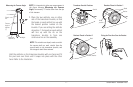
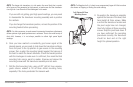
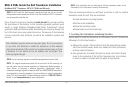
7. Adjust the transducer assembly vertically, until the seam on the
leading edge of the transducer (the edge closest to the transom of
the boat) is level and just slightly below the hull.
NOTE: The transducer has a natural downward slant of 4-5 degrees from leading
edge (closest to the boat transom) to trailing edge (farthest away from the boat).
Looking at the back of the transducer, the seam should be slightly below the
bottom of the hull.
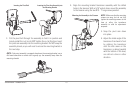
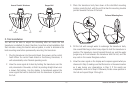
8. Continue to adjust until the bracket is also level from port to
starboard (horizontally level as you look at the transducer from
behind the boat).
9. Mark the correct position on the transom by tracing the silhouette
of the transducer mounting bracket with a pencil or marker.
10. Tighten the pivot bolt, using the pivot screw and nut to lock the
assembly. Hand tighten only!
11. Snap open the assembly and hand-tighten the two mounting
screws, then snap the assembly closed.
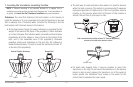
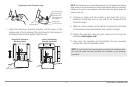
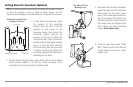
Adjusting the Initial Transducer Angle
Leading edge
One clicktoo high
Correctly aligned
(transducer side
seamaligned with
boatbottom)
Trailing edge
One clicktoo low
NOTE:
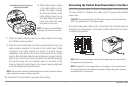
You will drill the third mounting hole and finalize the installation after
you route the cable and test and finish the installation in the following
procedures.
Adjusting the Transducer
Mounting Position
Seam aligned with boat hull
Leveling the Mounting
Assembly Horizontally
Level
Level


Find Your Products By Category
- Communications
- Photography
- Portable Media
- Home Audio
- Kitchen Appliance
- Computer Equipment
- TV and Video
- Cell Phone
- Household Appliance
- Video Game
- Laundry Appliance
- Musical Instruments & Equipment
- Power Tools
- Automotive
- Car Audio and Video
- Outdoor Cooking
- Marine Equipment
- Lawn and Garden
- Personal Care
- Fitness & Sports
- Baby
Please Login
