

0
Owner's of the Bradley Smoker Smoker BTIS1 gave it a score of 0 out of 5. Here's how the scores stacked up:


Seasoning & Preparation
For Use
Seasoning the Bradley Smoker
®
is an
ongoing process, the more you use it, the
better tasting your foods will be.
Seasoning is mainly to remove the
impartial smells from your smoker. The
smell of your new Bradley Smoker
®
is not
necessarily how you want your food to
taste.
Seasoning Method:
Clean the racks and drip tray and place
into the smoker.
Fill the waste pot 1/2 full of water.
Load the feed tube with 3-6 bisquettes.
Open the damper (7); slightly [at the top
of the smoker].
Plug smoker into its own designated
outlet.
Press Bisquette Advance Button (6) until
a bisquette is on the Bisquette Burner
Element (F).
Turn on the smoker by moving the
temperature heat control switch (10) to
between low to medium. Wait for five
minutes. The thermometer (9) should
read 66°C (150°F).
If it is higher, bring down the temperature
by adjusting the temperature heat
control switch to the left to lower and
vice versa when the temperature reads
lower than 66°C (150°F).
Smoke the tower continuously at
66°C (150°F) for 1 - 2 hours, or until
bisquettes are out.
Note: Each Bradley Flavour Bisquette
®
burns approximately 20 minutes.
Getting Started
After seasoning the smoker, refill the
waste pot 1/2 full of water.
Turn on the smoke generator by pressing
the ON/OFF switch (12).
When the smoker generator indicator
light (5) is on, this means the burner ele-
ment is on and that it will start to burn
bisquettes.
Press the bisquette advance button (6)
to push a bisquette onto the bisquette
burner element (F). In approximately
20 minutes the next bisquette will
advance.
Note: After the advance button has been
pressed, a new cycle will start, (or)
in approximately 20 minutes a new
bisquette will advance.
Place your food onto the cooking racks
and load them into the smoker.
Set the damper at the desired opening.
If heat is required, slowly move the heat
switch to the desired temperature, as per
the thermometer.
Cold Smoke - use the smoke generator
only
Hot Smoke - the smoke generator and
temperature heat control switch will be on.
Note: The thermometer will only read the air
temperature inside the tower. To get a
more accurate temperature of the food
being smoked, place a damp piece of
cloth around the thermometer inside the
smoker. Keep in mind that the ambient
temperature will affect the cooking
temperature of the smoker.
Normal cooking temperature is between
200-250ºF. Keep in mind that the
thermometer is for reference only, and
is not intended to give exact internal
temperatures. The internal temperature
will be higher closer to the heating
element.
“ Remember to clean your smoker
after each use.”
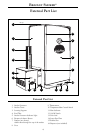
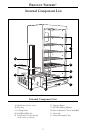
OPERATION
GUIDELINES
Refer to part numbers in the External Parts List diagram
6


Find Your Products By Category
- Communications
- Photography
- Portable Media
- Home Audio
- Kitchen Appliance
- Computer Equipment
- TV and Video
- Cell Phone
- Household Appliance
- Video Game
- Laundry Appliance
- Musical Instruments & Equipment
- Power Tools
- Automotive
- Car Audio and Video
- Outdoor Cooking
- Marine Equipment
- Lawn and Garden
- Personal Care
- Fitness & Sports
- Baby
Please Login
