

0
Owner's of the Bradley Smoker Smoker BTIS1 gave it a score of 0 out of 5. Here's how the scores stacked up:


ASSEMBLING
I
NSTRUCTIONS
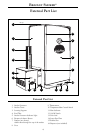
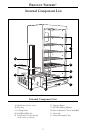
Refer to Part numbers in Bradley Smoker External Part List and Internal Component list Diagrams.
How to Assemble the
Bradley Smoker
®
1. Remove smoker from box.
2. Take all packaged parts out of smoker.
3. Remove all protective packaging
materials from parts.
Install Smoke Generator:
Attach smoke generator (1) to the
smoker tower (2). Aim the bisquette
burner (F) toward the tower opening.
Align smoke generator key holes to
smoker tower locating supports (3).
Secure the generator by pushing down
firmly.
Insert the feed tube (4) on top of the
smoke generator and load it with the
desired number of Bradley Flavour
Bisquettes
®
. Plug the short power cord
(A) from the smoke generator into the
smoker tower.
Set Up Smoker Tower:
Place drip tray (B) onto the bottom side
ladder.
Place cooking racks (C) onto the side
ladders above the drip tray. Place
rectangular tray (J) at the bottom of the
unit.
Fill the waste pot half full with water and
place on the rectangular bottom tray (J)
in waste pot position (D).
Plug the longer power cord (E-not shown)
from smoker tower into the approved
grounded electrical outlet.
To Remove Smoke Generator:
Unplug short power cord. Detach
smoke generator from the smoker tower
by raising the smoke generator gently
upward and pull it outward.
Handling of Packaging
All packaging should be discarded, as
per the regulations in your area. The
box can be used only to store smoker
when not in use. The box should not
be used as a cover when smoker is in use.
3


Find Your Products By Category
- Communications
- Photography
- Portable Media
- Home Audio
- Kitchen Appliance
- Computer Equipment
- TV and Video
- Cell Phone
- Household Appliance
- Video Game
- Laundry Appliance
- Musical Instruments & Equipment
- Power Tools
- Automotive
- Car Audio and Video
- Outdoor Cooking
- Marine Equipment
- Lawn and Garden
- Personal Care
- Fitness & Sports
- Baby
Please Login
