

4.8
Owner's of the Bradley Smoker Smoker BTDS108P gave it a score of 4.8 out of 5. Here's how the scores stacked up:

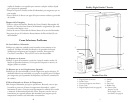
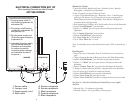
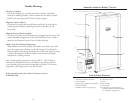

Install Digital Smoke Generator (see page 5)
• Attach digital smoke generator (1) to the smoker tower (2) by placing the
Bisquette Burner (G) through the left side opening of the tower. Align the
generator keyholes to the two supports (3) on the side and push down to
secure in position.
• Insert the Feeder Tube (4) into the top of the smoke generator. Push
down firmly. Load with desired amount of Bradley Flavor Bisquettes.
• Plug the Sensor Cable (1) into the back of the smoke generator (A) and
smoker (B). (see page 8)
• Plug the Jumper Cord (2) into the back of the smoke generator (D) and
then into the back of the smoke tower (C). (see page 8)
• Plug the Power Supply Cord (3) into the power receptacle (E).
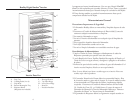
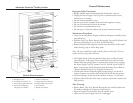
Set Up Smoker Tower (see page 6)
•
Place Racks, either four or six, (C) onto side supports above the Drip Tray (B).
• Place Drip Tray (B) “V” facing down beneath the Racks on the
brass side pins.
• Place the Rectangular Tray (E) on the bottom of the smoker.
• Fill the Drip Bowl (D) half full with water and place in the center of
Rectangular Tray to catch burnt Bisquettes. During a long smoking
period, the Drip Bowl may require changing the water.
• Plug the Power Supply Cord (3) from the smoke generator into an
approved grounded electrical outlet (4). (see page 8)
To Remove Smoke Generator
• Make sure the smoke generator has had time to cool down. Unplug
the Power Supply Cord from the wall outlet (4) and from the smoke
generator (3). Detach Sensor Cable (1) and Jumper Cord (2) and then
remove smoke generator from the smoker tower by raising it gently
upward and pulling it outward.
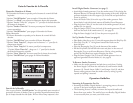
Operation Guideline
Seasoning & Preparation For Use
• Seasoning the Bradley Digital Smoker is an ongoing process, the more
you use it, the better tasting the foods will be.
• The Seasoning Process is mainly to remove the impartial smells and
flavors from your smoker. The smell of your new Bradley Digital Smoker
is not necessarily how you want your food to taste.
7
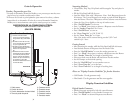
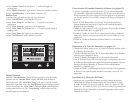
Guía de Función de la Pantalla
Generador Numérico de Humo
* El Generador de Humo es operado por los botones de control del lado
izquierdo.
* Oprima “On/Off Smoker” para encender el Generador de Humo.
* Oprima “>>>Wood” para avanzar los Bisquettes dentro del quemador.
* Oprima “Smoker Timer Set” y despues “v ^” para fijar la deseada duración
del tiempo de ahumado.
* Oprima “Smoker Timer Set” de nuevo para empezar 20 minutos de
avance automático.
* Oprima “On/Off Smoker” para apagar el Generador de Humo.
Horno Ahumador
* El Horno Ahumador es operado por los botones de control del lado
derecho.
* Oprima “On/Off Oven” para encender el Horno Ahumador.
* Oprima “Oven Temp Set” y despues use los botones “v ^” para fijar la
temperatura deseada.
* Oprima “Oven Temp Set” de nuevo para fijar la temperatura.
* Oprima “Oven Timer Set” y luego use “v ^” para fijar la deseada
duración del tiempo de cocinado
* Oprima “Oven Timer Set” de nuevo para fijar el tiempo de cocinado.
* Oprima “On/Off Oven” para apagar en Horno Ahumador.
38
Función de la Pantalla
Una vez que el botón “On/Off Smoker” ha sido oprimido para encender el
generador de humo, el Smoker Timer se prenderá intermitentemente hasta
que el tiempo deseado ha sido fijado. El Oven Meat Temp empezará a leer


Find Your Products By Category
- Communications
- Photography
- Portable Media
- Home Audio
- Kitchen Appliance
- Computer Equipment
- TV and Video
- Cell Phone
- Household Appliance
- Video Game
- Laundry Appliance
- Musical Instruments & Equipment
- Power Tools
- Automotive
- Car Audio and Video
- Outdoor Cooking
- Marine Equipment
- Lawn and Garden
- Personal Care
- Fitness & Sports
- Baby
Please Login
