
0
Owner's of the Black & Decker Fan Black & Decker Fan gave it a score of 0 out of 5. Here's how the scores stacked up:

WARNING: This appliance has a polarized plug (one blade on the plug is wider than
the other). To reduce the risk of electric shock, only use a polarized plug in a polarized
outlet. If the plug does not fit easily into the outlet, turn the plug over so the right part
of the plug fits in the outlet's other slot. If the plug still does not fit, contact a qualified
electrician. Do not modify the plug in any way.
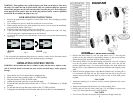
USER SERVICING INSTRUCTIONS
1. Remove the plug from the receptacle or other outlet device. Do not unplug by pulling
on the cord.
2. Use a suitable tool such as a small flat screwdriver or travel scissors.
3. When opening the fuse cover, slide-open the fuse access cover on top of the attachment
plug towards the blades. (See Fig.1)
4. Carefully remove the fuse by prying it out. (See Fig.2)
5. A fire can result from using the wrong fuse rating. Only replace fuses with a 2.5 Amp,
125 Volt rating fuse. (replacement fuses are not included)
6. To close the fuse access cover, slide the fuse access cover on top of the attachment plug.
(see Fig.3)
Fig.1 Fig.2 Fig.3
7. Do not replace the attachment plug because it contains a safety device (fuse) that should
not be removed. Discard this product if the attachment plug is damaged.
OPERATING INSTRUCTIONS
WARNING: Do not attach the fan to a window or place the fan near a window, as the
risk of electrical shock exists and can cause serious personal injury and/or property
damage.
1. Place the fan on a level surface that is completely dry.
2. Make sure the rotary switch is at the “0” (OFF) position.
3. Plug the unit into a 120V AC 60Hz outlet.
4. Adjust the fan head vertically to your desired angle.
5. To run the unit, turn the rotary switch to the “1” (Low), “2” (Medium) or “3” (High)
position.
6. To turn the unit off, turn the rotary switch to the “0” (OFF) position.
7. Unplug the unit from the electrical outlet when it's not in use or is left unattended.
4
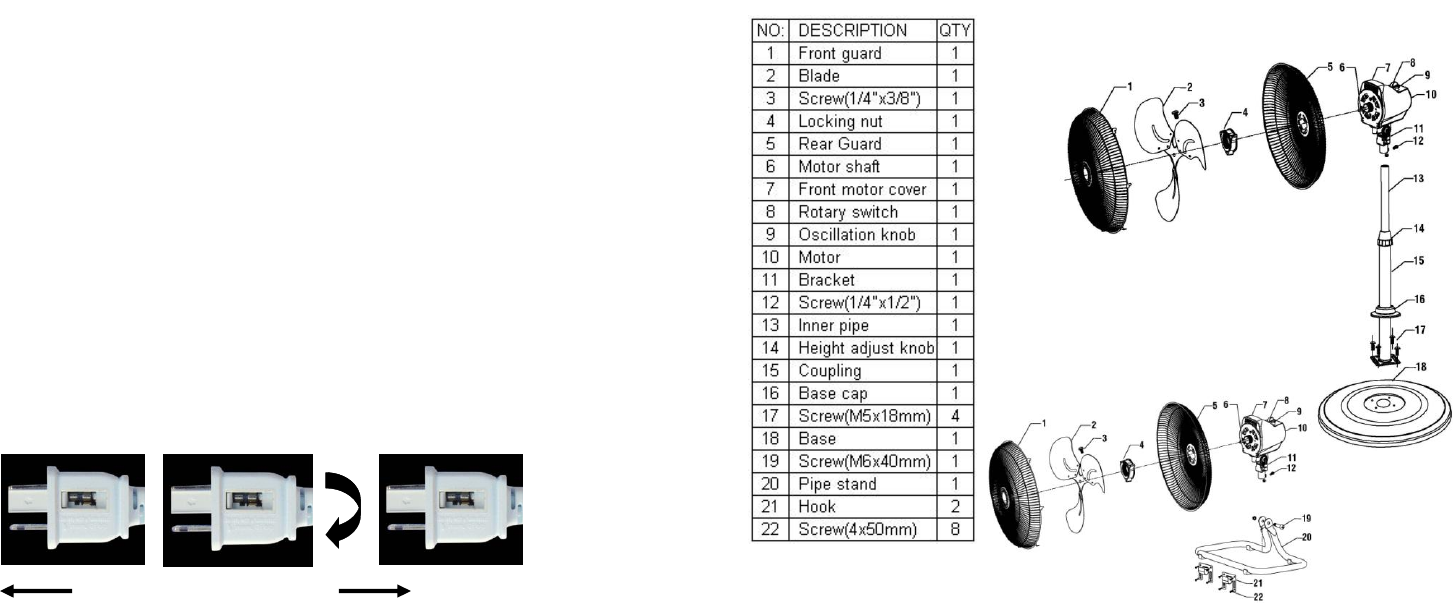
ASSEMBLY INSTRUCTIONS
1. Position the Rear Guard (5) over the front motor cover (7) and align the
notches in the grill with the corresponding features on the motor housing.
Secure the rear grill in position with the Locking Nut (4)..
2. Place the fan blade (2) on the shaft making sure that the screw (3) is aligned
over the flat portion of the Motor Shaft(6). With the screw over the flat
portion, tighten the screw (3) to secure the fan blade to the shaft. Make sure
that the screw is fully tightened to prevent the fan blade from slipping on the
shaft.
3. With fan head in upright position, align Black & Decker logo of front grill so
it is horizontal and right side up. By starting with the top of the grill and
working down push the guard rings in place, so that it holds both guards
together.
FAN STAND
1. Attach the coupling (15) to the base (18) by securely tighten the four screws
onto the base.
2. Adjust the fan height with the Knob (14) on the Coupling Tube.
3. Position the fan onto the inner stand pipe (13) and tighten in place using
screw (12). Ensure that the screw is fully tightened.
FAN TABLE
1. Use a screw (19) and a nut to place the fan head into the pipe stand (19).
5
DIAGRAM


Find Your Products By Category
- Communications
- Photography
- Portable Media
- Home Audio
- Kitchen Appliance
- Computer Equipment
- TV and Video
- Cell Phone
- Household Appliance
- Video Game
- Laundry Appliance
- Musical Instruments & Equipment
- Power Tools
- Automotive
- Car Audio and Video
- Outdoor Cooking
- Marine Equipment
- Lawn and Garden
- Personal Care
- Fitness & Sports
- Baby
Please Login
