
0
Owner's of the Aroma Coffeemaker ACU-140S gave it a score of 0 out of 5. Here's how the scores stacked up:
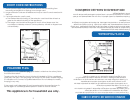
CAUTION:
• Never open the ‘Lock-on Lid’ while the urn is in the brewing process.
• When filling with water, never exceed the ‘Maximum Water Line’ inside of
the urn.
TTOO MMAAKKEE CCOOFFFFEEEE ((CCOONNTT..))::
UUSSIINNGG YYOOUURR UURRNN
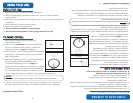
6. Plug the power cord into a wall outlet. The ‘Power Indicator Light’ will illuminate
and the urn will begin brewing coffee.
7. When coffee is ready to serve, the ‘Ready Indicator Light’ will illuminate.
NOTE:
If the urn is to be in use for several hours, it is best to remove the ‘Stainless Steel Coffee
Basket’ prior to serving coffee. This will prevent the oil of the coffee from dripping down,
which may create a bitter flavor over an extended period of time. Use extreme caution
when removing the ‘Stainless Steel Coffee Basket’ as it will be hot.
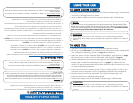
TTOO MMAAKKEE TTEEAA::
1. Place the urn upright on a dry, sturdy and heat-resistant surface.
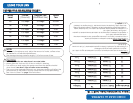
2. Fill the urn with cold water in accordance with the amount of tea needed. See
the “Coffee/Tea Measuring Chart” on page 6 for reference.
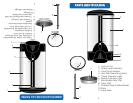
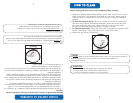
3. Insert the ‘Stem’ into the ‘Stainless Steel Coffee Basket’ (see Figure A on page
4), then place the ‘Stem’ into the ‘Stem Well’ (see Figure B on page 4).
4. Add the desired amount of tea or tea bags into the ‘Stainless Steel Coffee
Basket’ (see “Coffee/Tea Measuring Chart” on page 6 for reference). The
amount of tea recommended will produce mild tea. Adjust the amount of tea
to match individual preference.
5. Twist the ‘Lock-on Lid’ in place on top of the urn. Make sure the ‘Lock-on Lid’
has been turned clockwise until it is completely locked into the handle slots.
6. Plug the power cord into a wall outlet. The ‘Power Indicator Light’ will
illuminate and the urn will begin brewing tea.
7. When tea is ready to serve, the ‘Ready Indicator Light’ will illuminate.
CAUTION:
• Never open the ‘Lock-on Lid’ while the urn is in the brewing process.
• When filling with water, never exceed the ‘Maximum Water Line’ inside of
the urn.
5
PRECAUCIÓN:
• Nunca abra la “tapa con cierre de seguridad” mientras la cafetera esté en proceso de
preparar el café.
• Cuando la está llenando con agua, nunca exceda la “línea máxima de agua”dentro
de la cafetera.
PPAARRAA PPRREEPPAARRAARR CCAAFFÉÉ ((CCOONNTT..))::
6. Conecte el enchufe a un tomacorriente de pared. Se encenderá la “luz indicadora de
Encendido” y la cafetera comenzará a preparar el café.
7. Cuando el café esté listo para servir, la “luz indicadora de Listo” se encenderá.
NOTA:
Si se va a utilizar la cafetera durante varias horas, es mejor quitar la “canasta de filtradode café de
acero inoxidable” antes de servir el café. Esto evitará que el aceite del café gotee en el café
preparado y que produzca un sabor amargo en un lapso de tiempo extendido. Proceda con
extrema precaución cuando retire la “canasta de filtrado de café de acero inoxidable” porque
estará caliente.
PPAARRAA PPRREEPPAARRAARR TTÉÉ::
1. Coloque la cafetera verticalmente en una superficie seca, firme y resistente al calor.
2. Llene la jarra con agua fría según la cantidad de té que desee preparar.
Consulte la “tabla para medir el café y el té” en la página 6 como referencia.
3. Coloque el “vástago” en la “canasta de filtrado de café de acero inoxidable”
(consulte la Figura A en la página 4), luego coloque el “vástago” adentro del
“cavidad del vástago” (consulte la Figura B en la página 4).
4. Agregue la cantidad deseada de té o de bolsitas de té en la “canasta de filtrado de
café de acero inoxidable” (Consulte la “tabla para medir el café y el té” en la página 6
como referencia). La cantidad de té recomendada producirá un té no muy fuerte.
Ajuste la cantidad de té al gusto individual.
5. Gire la “tapa con cierre de seguridad” en su lugar sobre la cafetera. Asegúrese de que
la “tapa con cierre de seguridad” se haya girado en la dirección de las manecillas del
reloj hasta que esté completamente cerrada en las ranuras de las asas.
6. Conecte el enchufe a un tomacorriente de pared. Se encenderá la “luz indicadora de
Encendido” y la cafetera comenzará a preparar el té.
7. Cuando el té esté listo para servir, la “luz indicadora de Listo” se encenderá.
5
PRECAUCIÓN:
• Nunca abra la “tapa con cierre de seguridad” mientras la cafetera esté en proceso de
preparar el café.
• Cuando la está llenando con agua, nunca exceda la “línea máxima de agua” dentro de la
cafetera.
COMO USAR LA CAFETERA


Find Your Products By Category
- Communications
- Photography
- Portable Media
- Home Audio
- Kitchen Appliance
- Computer Equipment
- TV and Video
- Cell Phone
- Household Appliance
- Video Game
- Laundry Appliance
- Musical Instruments & Equipment
- Power Tools
- Automotive
- Car Audio and Video
- Outdoor Cooking
- Marine Equipment
- Lawn and Garden
- Personal Care
- Fitness & Sports
- Baby
Please Login
