
0
Owner's of the APC Home Security System NetBotz gave it a score of 0 out of 5. Here's how the scores stacked up:

38NetBotz Appliance User’s Guide
Associating relays, switches, or outlets with integrated cameras and camera pods.
Relays, switches, and outlets can be associated with cameras to simplify manually changing relay states
from the Camera View.
Once a relay, switch, or outlet is associated with a camera, you can associate an action with it, and
manually generate that action from the camera image in the Camera View. You right-click the camera
image, and select the action from the menu. You can also configure Advanced View to include a button
on the camera image to generate the action. This applies to integrated cameras and cameras connected to
the appliance, but not shared IP cameras.
To associate a relay or switch with a camera, and include buttons in the Camera View for the associated
relays:
1. Double-click the Camera Pods icon.
2. A list of integrated cameras and cameras connected to the appliance appears. Select the camera
you want to configure.
3. Click Settings. Select the Associated Sensors tab.
4. Select one or more relays, switches, or outlets from Available Sensors to associate with the
selected camera. Click -> (right arrow) to move the selected relays to Selected Sensors. To
remove a sensor from the list, select one or more relays from Selected Sensors, and click <- (left
arrow) to move the selected sensor to Available Sensors.
5. To include buttons for the associated relay actions in the Camera View, check Overlay Buttons
on Camera Image.
6. Select the location in the camera image to place the associated relay action buttons.
7. Click OK.
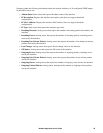
Capture settings
Select a camera from the Camera Pods window and click Capture to open the Camera Capture
Settings window. From this window you can configure the following settings:
Note: Fields displayed may vary depending on the features of the camera selected.
Field Description
Brightness The brightness of the image captured by the camera, from 0 to 255.
Gamma correction Adjust the overall brightness of the camera image. Images not
properly corrected can look either bleached out or too dark.
Video format The format in which video is transmitted by the video source.
Note: This option is available only when configuring Capture
settings for CCTV adapter pods.
Rotate camera image 180 degrees Rotate the image captured by the camera 180 degrees.
Note: This option is not available when configuring Capture
settings for CCTV adapter pods.


Find Your Products By Category
- Communications
- Photography
- Portable Media
- Home Audio
- Kitchen Appliance
- Computer Equipment
- TV and Video
- Cell Phone
- Household Appliance
- Video Game
- Laundry Appliance
- Musical Instruments & Equipment
- Power Tools
- Automotive
- Car Audio and Video
- Outdoor Cooking
- Marine Equipment
- Lawn and Garden
- Personal Care
- Fitness & Sports
- Baby
Please Login
