
0
Owner's of the APC Home Security System NetBotz gave it a score of 0 out of 5. Here's how the scores stacked up:


95NetBotz Appliance User’s Guide
5. Select the remote device that you just added from the Remote Devices list. A list of pods
available for sharing appears in the Available Pods list.
6. For each pod that you want to centrally manage, select the pod from the Available Pods list
(ignore any instances of Base Enclosure in the list) and then click Share Remote Pod.
Setting up a Pelco shared IP camera pod
When installing a Pelco camera for use with a NetBotz appliance, perform the following steps before
following the normal IP camera pod setup procedure. Ensure the secondary stream settings match the
primary stream settings on the Pelco camera.
1. Connect the Pelco camera to your network.
2. Discover the camera's IP using the Pelco Device Utility.
3. In a Web browser, bring up the start page of the camera's Web UI (http://<ip_address>).
4. Click the Login tab and log in with the default password.
5. Click Settings to display the settings page.
6. On the System tab, click Restore all Factory Defaults in the bottom right corner.
7. Wait for the camera to restart.
Setting up shared IP camera pods
To designate shared IP camera pods on the same network segment:
1. From the Appliance Settings area of the Configuration view, double-click the Pod, Pelco Camera,
and Rack Access PX-HID Sharing icon. The Pod & Rack Access PX-HID Sharing Configuration
window opens.
2. Click Add Discovered Camera. The Configure Remote Device dialog box opens.
3. From the Discovered Camera List, select the camera you would like to share. The Hostname/IP
address field updates automatically.
– If the IP camera is not listed (only IP cameras on the same subnet will appear in the list), go to
“To designate shared sensor pods:” on page 94, where you can add the camera by entering the
IP address of the camera.
– Do not select any instances of Base Enclosure in the list. Those are for a future enhancement.
4. Enter information in the fields described below as needed. Then click OK. The camera appears in
the Remote Devices list.
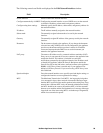
Field Description
Port TCP port over which pod sharing communications occur. Default
is 80 for HTTP, and 443 for HTTPS.
SSL Options The SSL options for pod sharing communications.
Add as camera The option to add the selected remote device as a camera, checked
automatically when a discovered cameras is selected from the list.
Do not select this option for remote devices that are not cameras.
User name The User name used to access the remote device. Some pod
sharing functionality is only available to a user account with
Administrator privileges.


Find Your Products By Category
- Communications
- Photography
- Portable Media
- Home Audio
- Kitchen Appliance
- Computer Equipment
- TV and Video
- Cell Phone
- Household Appliance
- Video Game
- Laundry Appliance
- Musical Instruments & Equipment
- Power Tools
- Automotive
- Car Audio and Video
- Outdoor Cooking
- Marine Equipment
- Lawn and Garden
- Personal Care
- Fitness & Sports
- Baby
Please Login
